

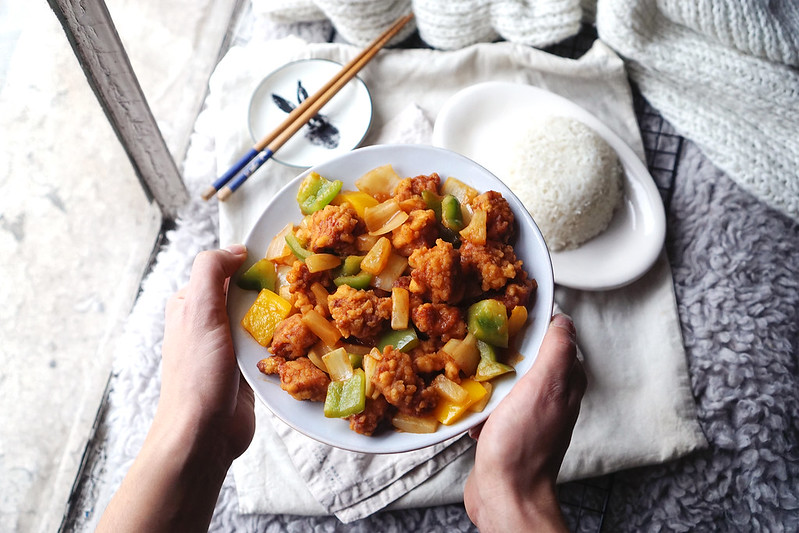
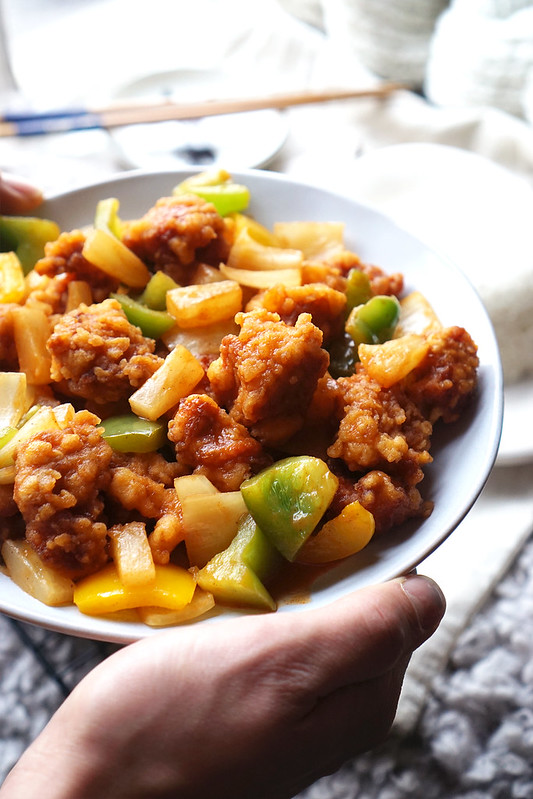
I posted a quick and easy Chinese sweet and sour chicken recipe a while back, but today I decided it was time to share a takeaway style version!
In this version, the chicken is first battered and deep fried for a more authentic restaurant feel so it’s a bit more time consuming to make, but you can easily skip that step to simplify the recipe and/or make it healthier. At the end of the day, I think both versions are equally as delicious but it’s nice to go that extra mile sometimes for a special treat. ?
Also, just a random tip: I highly recommend getting your ingredients from Chinese supermarkets if possible. It can really make a world of difference when it comes to reproducing those authentic Chinese restaurant flavours at home. These days they often have a few naturally gluten free soy sauces that taste much better in my opinion and even gluten free shaohsing wine. For example, is it just me or have any of you noticed how sweet the gluten free soy sauces tend to be in mainstream supermarkets? My personal favourite is Datu Puti which is a naturally gluten free Filipino soy sauce that can be found in many Chinese shops around London (as well on online). Another one is Chinese five spice. If you’ve only ever used mainstream supermarket versions, you may be shocked to find how much better and more flavourful these things can be when bought in Chinese supermarkets!
Gluten Free Chinese Sweet and Sour Chicken Recipe:

- 450-500g chicken breast
- 2 Tbsp gluten free soy sauce (I used Datu Puti)
- A pinch of salt
- 2 eggs
- 75g (1/2 cup) cornflour
- 75g (1/2 cup) gluten free self-raising flour (I used Doves Farm)
- Cooking oil (to fry)
- 10 Tbsp ketchup
- 400ml pineapple juice (from the canned pineapple, not 'proper' juice)
- 2 Tbsp fish sauce
- 2 Tbsp gluten free soy sauce
- 6 Tbsp gluten free shaohsing wine (I use the brand Hua Diao Jiu – if you can’t find any, substitute with rice or sherry vinegar)
- 2 Tbsp ginger powder (or grated fresh ginger)
- 2 Tbsp garlic powder (or crushed garlic cloves)
- 1 or 2 tsp Chinese five spice
- 2 bell peppers
- 2 onions
- 260g pineapple chunks (canned in juice)
FRYING TIME: about 3 minutes per batch
NOTE: just a heads up I'm not a fan of sickly sweet foods so if you like your sweet and sour chicken very sweet, like some Chinese takeaways are, feel free to add sugar.
Directions
For the fried chicken:
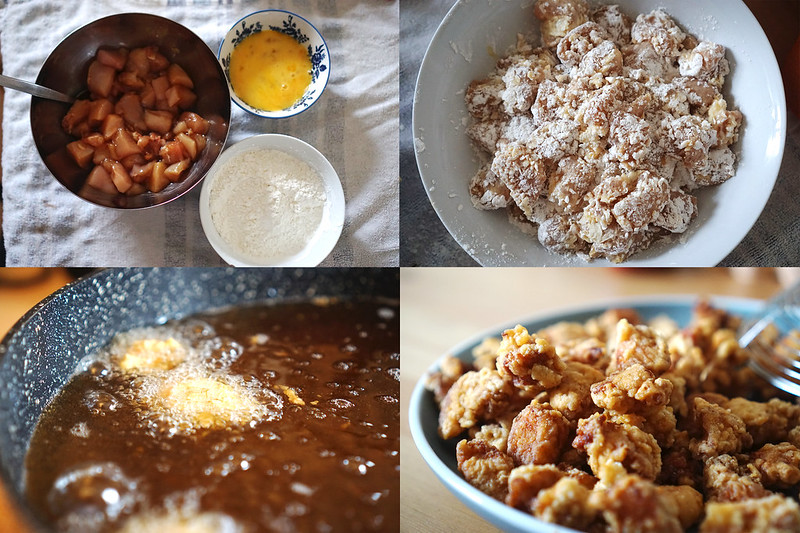
- Cut the chicken breasts into small cubes.
- Mix the chicken cubes with 2 tablespoons of soy sauce and a pinch of salt in a bowl.
- Batter the chicken: prepare two small bowls, one with two beaten eggs and another with both flours combined, and dip each chicken cube one by one in the egg and then in the flour mixture until covered completely. Shake off any excess flour and set aside.
- Heat up one or two inches of cooking oil in a pan or wok and get the temperature to stabilise at about 175C (350F) using a food thermometer.
- Lower the battered chicken cubes into the oil one by one (using a spoon) and start your timer. Then fry for 3 to 3.5 minutes, until the chicken is crispy and golden. Then take them out and set aside on some kitchen towels to absorb the excess oil. Note: cook them in a few batches to avoid overcrowding the pan (if you put too many at once, the oil temperature might drop too low). Also measure the oil temperature after adding the chicken and adjust the heat if necessary.
- After letting the fried chicken cool down for a few minutes, add it all back into the hot oil and fry it a second time but only for 30 seconds! Then set aside on kitchen towel again. Note: this step isn’t necessary, but it helps the batter stay crispy longer, especially once added to the sauce.
For the vegetables:
- Roughly chop the onions, bell peppers and pineapple (if applicable) into chunks.
- Pan fry the onion chunks in a bit of oil on medium/low heat until they start softening up, but are still a bit crunchy. Then set aside in a bowl.
- Pan fry the peppers and pineapple chunks for about 5 minutes, also keeping the peppers a bit crunchy. Then set aside with the onions. NOTE: don’t throw away the juice from the canned pineapple as we need it for the sauce! ?
For the Chinese sweet and sour sauce:
- Add all of the sweet and sour sauce ingredients into the pan and cook on medium/low heat for about 5 minutes. Note: if using fresh garlic and ginger, start by pan frying them in a bit of oil, on low/medium heat, for a couple of minutes.
- Then add the fried chicken and vegetables, mix well and cook for a few minutes.
Enjoy!

I made this last night and thought it was delicious! I made half the sauce recipe for 2 people and it was very generous. I thickened the sauce slightly with a tsp of cornstarch in a little water. I also omitted the salt in the cubed chicken as my tamarinis very salty. I really enjoyed all the flavours of sweet and sour without it being cloyingly sweet. Thank you for the recipe!
Cheers for the feedback! I’m glad to hear you loved it. 🙂