

I made my own gluten free pita bread that actually puff up inside!
I know I always go on about not being a fan of bread, but what I really mean by that is that I was never a big sliced bread eater. Even back in my pre-gluten free days. But I did however have a very soft spot for pita, ciabatta, baguette, roti and so on which I have missed so much since being gluten free.
And let’s face it, I’m very grateful for the free from section and how much it’s expanded over the years, but the bread offerings still tend to be questionable. I mean, I get it. At its core, gluten free bread is doomed; bread will just never be as good without gluten. ? But to add insult to the injury, we then have to pay a high price for something not that great and worse, full of crap which is added as an attempt to replicate the real thing. And it’s essentially turning bread, a simple staple, into junk food.
So after 10 years on a gluten free diet, I had pretty much given up on any bread products until I finally started to try my hand at homemade bread. And today I’m very proud to say that I can now finally add pita bread back on the menu!
And don’t be afraid of working with yeast. It’s a mental barrier that puts a lot of people off… but if you can push through it and start making your own bread products at home, you may just start to enjoy bread again.

MY TIPS:
1. Use bread flour. Using a gluten free flour blend made specifically to make bread makes a big difference to the texture. These blends are usually a bit different in their composition and higher in protein. I personally really enjoy Freee Foods (Doves Farm).
2. Don’t skip the resting time. Let your dough rest for 2 hours in a warm spot. This is important in order to get a better, softer texture by giving the flour time to absorb the liquids properly and by letting the yeast do its thing i.e. break down starch molecules into alcohol and gas that produces those little air bubbles that make your bread lighter and fluffier.
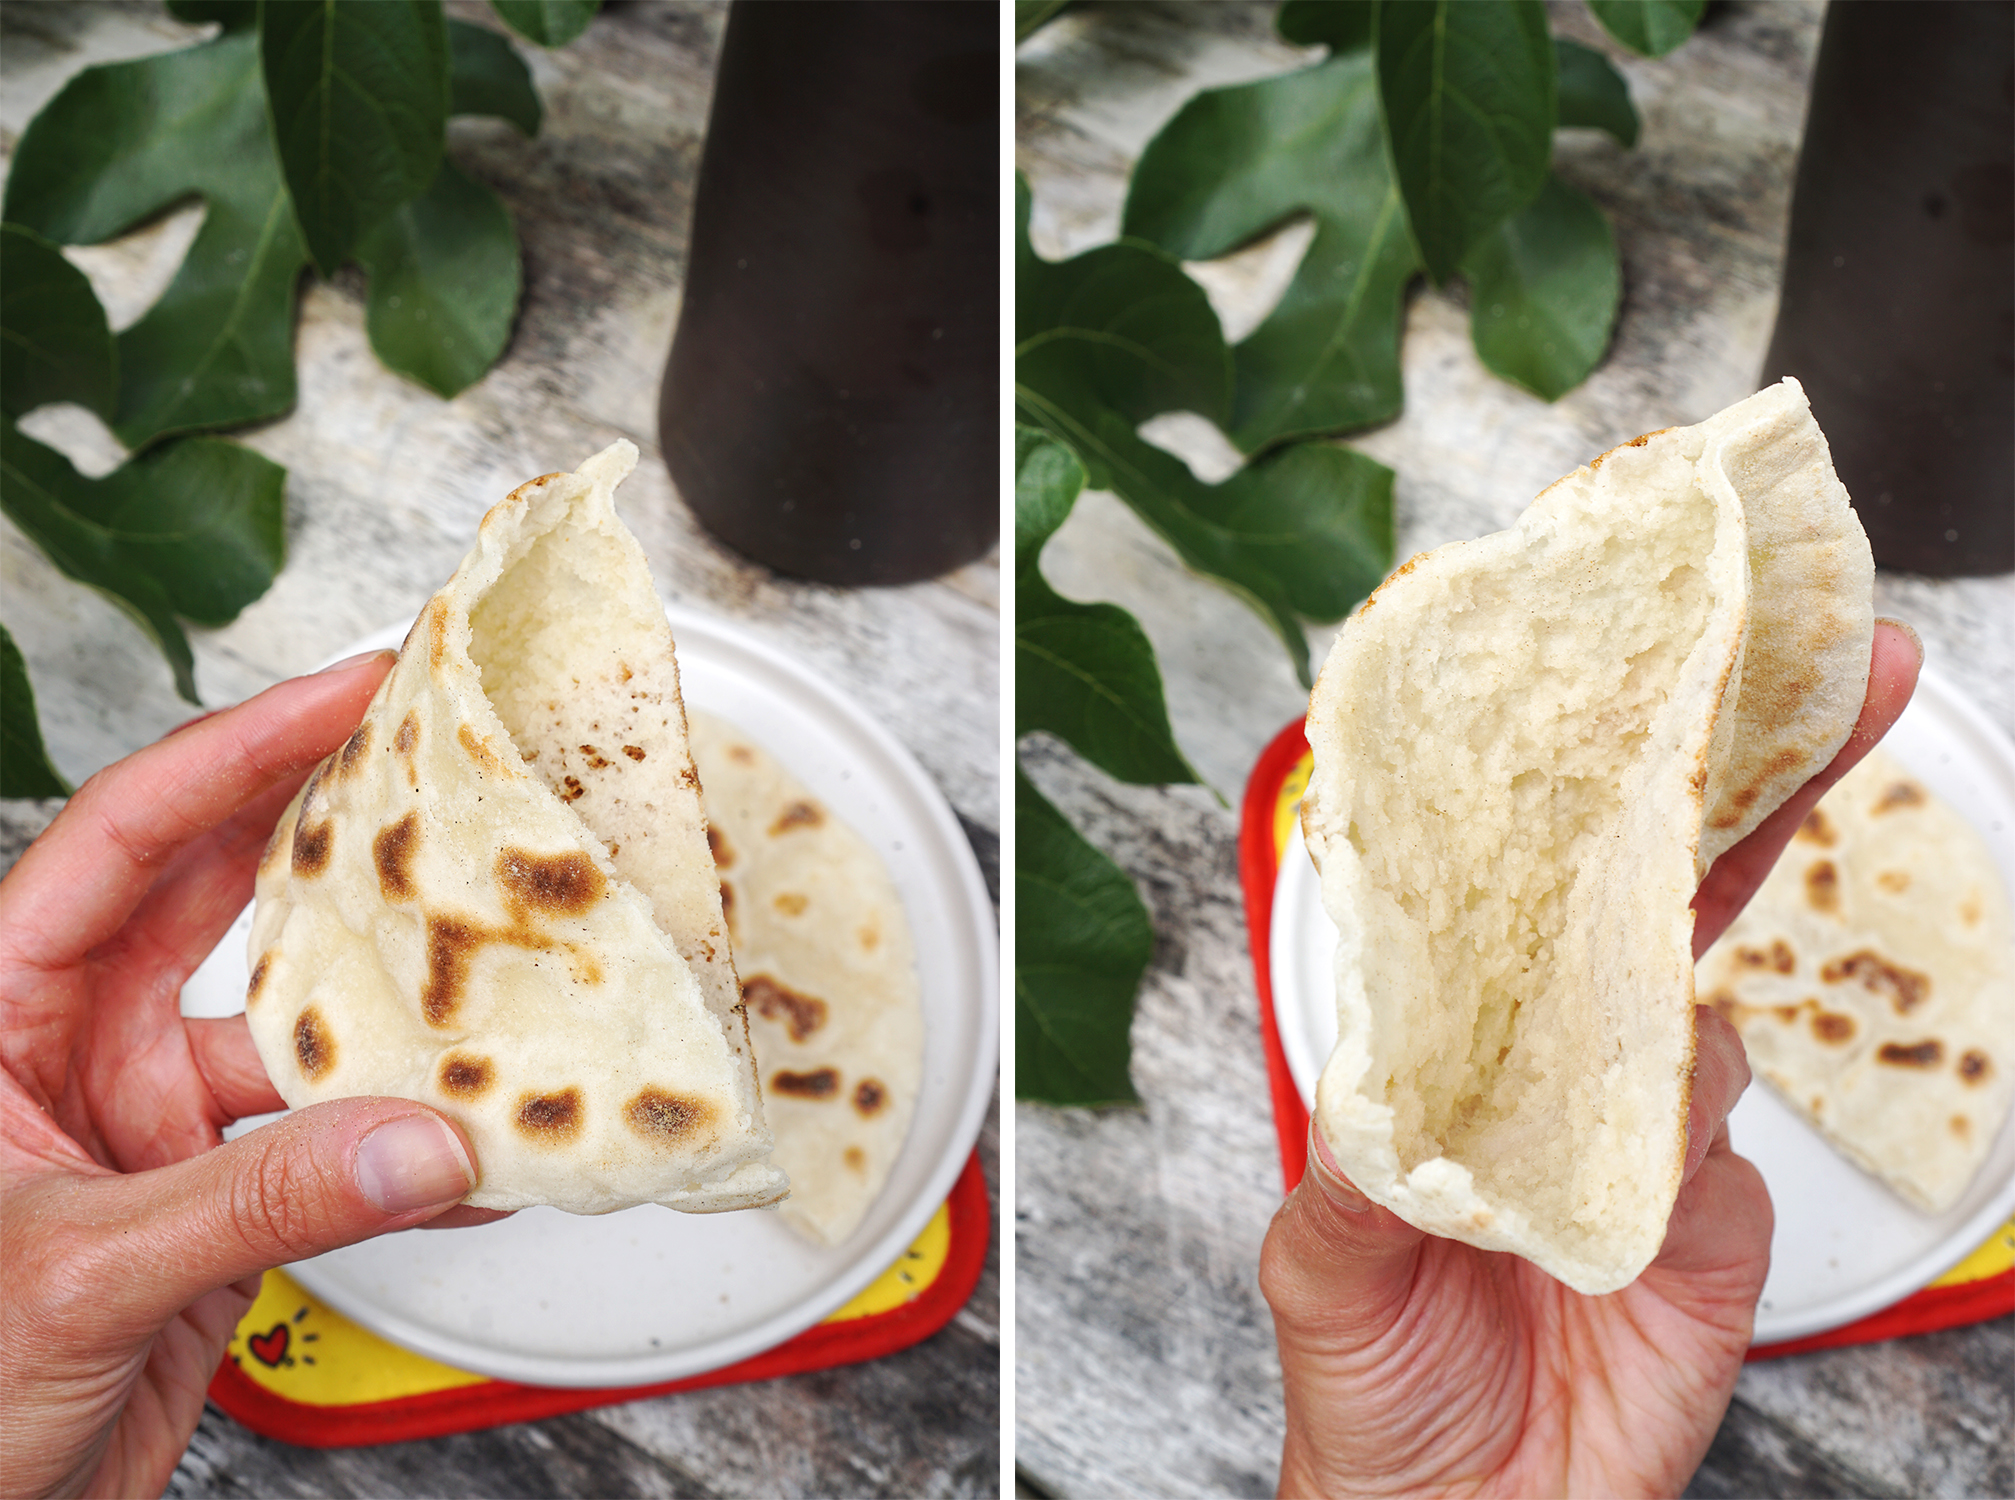
3. Roll them thin. Start by cooking one as as test and if you find that it doesn’t puff up inside, it may be that your pita breads are too thick. So try making the next one thinner until you figure what works best. It can take a bit of practice.
4. These are cooked on a hot plate / griddle plate / skillet / cast iron, but you can technically bake them instead, although the result isn’t quite as nice in my opinion. If you do wish to bake them though, cook for about 4-5 minutes in a pre-heated oven, on a very hot pre-heated baking tray, at 230C (450F).
And onto my gluten free pita bread recipe:

- 1 tsp dry active yeast
- 2 tsp granulated sugar
- 30g hot water
- 150g gluten free bread flour (I used Freee Foods / Doves Farm)
- + a bit more flour to knead and roll the dough
- ¼ tsp salt
- 1 tsp baking powder
- 125g plain yoghurt (the thick Greek-style kind, like this one)
- 1 Tbsp (15g) butter (melted)
COOKING TIME: 5 mins (per pita bread)
* Cooked on skillet / cast iron / hot plate / griddle plate
Directions

ACTIVATE YOUR DRY ACTIVE YEAST:
- Heat up 30g of water in the microwave or a kettle and add into a small bowl. Dip your finger in and check the temperature. It should be quite warm, somewhere between lukewarm and boiling hot. If it’s too cold or too hot (boiling), it won’t work.
- Add 2 teaspoons of sugar and stir to dissolve.
- Then add your dry active yeast, stir quickly and leave the bowl to sit in a warm place for a few minutes, until it becomes frothy. What I do is either place it on a window sill directly in the sunshine or turn the oven on to the lowest setting and place the bowl near or on the opened door.
PREPARE THE DOUGH:
- Combine the flour, baking powder, salt, yoghurt, butter (melted in the microwave first) and frothy yeast mixture in a bowl and mix until smooth. ‼️ Note: at this point it will be quite wet and sticky, not a dough you can mould into ball.
- Wrap the bowl with cling film and let it rest in a warm place for 2 hours.
- At this point you’re ready to knead and prep your pita breads.
- NOTE: you can prepare the dough in advance or cook only a bit of it at a time. The uncooked dough will keep in the fridge for a couple of days.

KNEAD AND PREPARE YOUR PITA BREADS:
- Lay a sheet of baking paper or foil on your work surface (this helps prevent sticking) and add a dusting of flour on top (about a heaped tablespoon).
- Add a small handful of dough and sprinkle some of the flour on top.
- Then knead the dough until you have a smooth dough ball, adding a little extra flour if necessary. ‼️ Note: be careful not to add too much flour. It should still be relatively sticky/tacky, but not to the point of being completely unmanageable with your hands. It may take a bit of practice to get it right.
- Next, add a tiny bit more flour on your work surface, add your dough ball and create a little well in it (as in the picture collage above). Then pinch the dough closed on itself, creating a little pocket inside.
- Flatten with your hands until thin (about half a cm) and smooth the edges.
- Then carefully run a spatula underneath, pushing a little extra flour under if needed, to unstick it from your work surface.
- Repeat with the rest of the dough and place them on a clean sheet of baking paper.
- Cover them with a damp cloth to stop them from drying out and let them proof (i.e. rest and rise one final time) for about 20-30 minutes.

COOK YOUR PITA BREAD:
- Heat up a hot plate/griddle plate or cast iron/frying pan on medium/high heat. To check that it’s hot enough, splash a tiny bit of water on top. If it sizzles immediately, it’s ready.
- Add a pita bread and cook until you see little bubbles starting to form (see picture collage above – it should take about 30-40 seconds).
- Flip your bread and cook for 2 minutes, then flip again and cook for another 2 minutes on the other side. ‼️ Note: I recommend starting with one as a test. If you find that it doesn’t puff up inside, it may be that your pita bread wasn’t thin enough so try flattening the next one more. It may take a bit of practice to get the right amount of flour and thickness right.
- Let your pita bread cool down completely before serving.
STORAGE:
- Store any leftovers in an airtight container as homemade breads have a tendency to dry very quickly.
- Microwave any leftovers briefly to soften them up again.
Hope you enjoy them and let me know what you think either here or on insta. 🙂
Kimi x

Absolutely delicious! Mine didn’t quite puff up like yours did, but they tasted great. And the dough was really easy to work with which was an added bonus! Thanks for the recipe.
You included baking powder in the recipe list, but did not write anywhere in the instructions what to do with it!
Oops, thanks for letting me know. I amended the post. It goes in at the same time as the dough ingredients, along with the flour and everything else. 🙃
I used Bobs gkuten free waffle and pancake mix with the tapioca and rice fluor and it was amazing