

I made some gluten free filled pasta from scratch!
I hope you’re not getting tired of my pasta posts yet? I’m on a roll lately. Since coming up with a good gluten free egg pasta recipe that I’m happy with, I’ve been wanting to make so many different things from it and thought it only made sense to start with filled pasta seeing as these are so expensive to buy pre-made! And that’s if they even exist at all where you live.
As a disclaimer, these are a bit thick compared to the super thin tortellini and ravioli you’d buy from a shop, but it’s a little tricky to get right when you don’t have a pasta machine. As I was rolling the dough, I did feel as though I could go thinner but I was also scared to mess it all up! lol If you do have a pasta machine however, you may be able to reach a better thickness than mine. The good news is they still ended up tasting really good either way.
UPDATE (14.03.21): I remade them thinner and much better!
I updated the instructions below and added some tips in the notes section. This new version is perfect, at last. Hope you like them! 🙂
 |
 |
P.S.: as with the tagliatelle I made before, I used Schar’s ‘Mix it Universal’ flour blend for these which works beautifully for gluten free pasta.
NOTES / TIPS:
1. Don’t skip the resting time.
As tempting as it may be to get it done quicker, this step is important. It gives the flour time to properly absorb the liquids and produces a better texture.
2. Don’t use random single flours.
You have to use a standard all purpose gluten free flour blend for this recipe to work. I highly recommend Schar ‘Mix It Universal’ if you have access to it where you live; it’s the best for gluten free egg pasta in my opinion. But of course, it will work with other blends with slight adjustments (as explained in the instructions).
3. Add more xanthan gum if your blend doesn’t contain any.
As instructed in the ingredients list below, add extra xanthan gum if your flour blend doesn’t already contain any (or a thickener). The Schar blend I’m using already contains a similar thickener and we’re adding some more on top in this recipe.
4. Make sure your pasta is VERY THIN.
The trick to good homemade filled pasta is making sure the dough is rolled very thin. You should be able to somewhat see your fingers through it when holding the rolled dough in your hands.
5. Why is my pasta huge after cooking it or taking longer to cook?
This means your pasta was too thick. Try rolling it thinner next time. 🙂


Gluten Free Filled Pasta Recipe:

- 140g plain all purpose gluten free flour blend (I used Schar 'Mix It Universal')
- ½ tsp xanthan gum (add 1 tsp instead of ½ if your blend doesn't already contain a thickener like xanthan gum)
- 2 eggs
- ½ tsp olive oil
- Optional: add a touch of ground turmeric to make them more yellow
- Grana padano
- Extra mature cheddar
- Tomato purée
- Black pepper
- Smoked paprika
* Bear in mind that the cooking time may vary depending on the thickness of your filled pasta.
Directions
PREPARE YOUR PASTA DOUGH:

- Mix the flour and xanthan gum together in a bowl.
- Then add the eggs and olive oil and mix with a fork until mostly combined, then knead with your hands until you have a smooth, crack free dough ball. Note: you can sprinkle a tiny bit of extra flour if the dough seems too sticky, but be careful not to overdo it. If the dough is too dry, add a tiny bit more oil or egg white until it’s just right.
LET THE DOUGH REST:
- Wrap the dough in cling film (to prevent it from drying) and let it rest at room temperature for about 30 minutes. You can also prepare it in advance; it will last in the fridge for a couple of days.
Note: don’t skip this step as it’s important for the texture to be right; it gives the flour time to absorb the liquids properly.
WHILE THE DOUGH RESTS, PREPARE YOUR FILLING:
For a simple cheese and tomato filling:
- Grate some grana padano (or parmesan) and extra mature cheddar and mix together. I used about equal amounts of each.
- Then add tomato purée, enough to make a thick paste.
- Add a dash of black pepper and smoked paprika (to taste).

ROLL THE DOUGH:
- Divide your dough into 4 portions. I find it’s way easier to work with a small portion of dough at a time. Otherwise it’s difficult to handle such a large piece of dough once flattened and it can be a pain to get the thickness right and even.
- Sprinkle some extra plain flour all over your work surface, roll one portion of dough into a ball and place it on there with another sprinkle of flour on top. Note: keep the rest wrapped up in cling film in the meantime so that it doesn’t dry up.
- Then start flattening the dough with the rolling pin and aim for a square shape as much as possible. To make sure it’s not sticking, keep flipping the dough upside down on and off and spread the loose flour evenly underneath each time. It should be very thin. You should be able to somewhat see your fingers through the dough when picking it up. Like in the picture collage above.
NOTE: despite starting out with a sticky dough, it should actually be very easy and comfortable to handle without sticking to your work surface or rolling pin at all. Feel free to add more flour throughout the process if necessary.

TO MAKE RAVIOLI (by hand):
- Trim the rugged edges.
- Then cut your dough into rectangles using a pasta/pizza cutter or knife.
- Carefully brush off any excess flour and set aside on a plate while you roll the rest of the dough. Note: keep the plate wrapped up with cling film to prevent them from drying.
- Re-knead all the trimmed edges together. If it’s too dry (and it most likely will be), rehydrate the dough by adding a tiny bit of olive oil as you knead it, until the consistency is right again. Then roll and so on.
- Now let’s fill the ravioli. To start with, if your dough still feels a bit thick and like it could be a bit thinner, go ahead and give it another roll. It’s ok if it messed up the shape a bit, they don’t have to be perfectly shaped. 😉
- Add a bit of filling (about half a teaspoon), rolled into a little ball.
- Then have a little pot of water ready on the side. Dip your finger in and wet the dough all around the edges. This will help everything stick together like glue.
- Fold in half and tuck the filling in by carefully pressing all around it with your fingers. Ideally there shouldn’t be any air/space left around the filling.
- Then create little indentations all around the edges with a fork.
- Sprinkle a bit of flour on top and set aside on a plate while you make the rest.
NOTE: if you’re a perfectionist, at this point you can also trim off any rugged edges. 😉
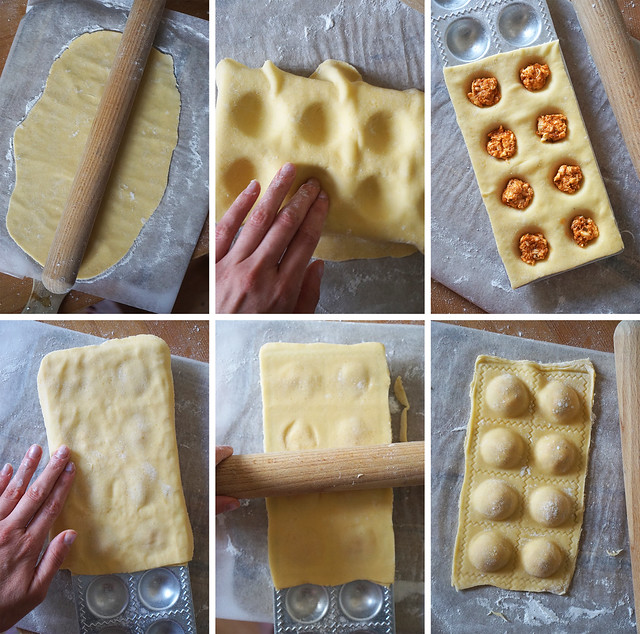
TO MAKE RAVIOLI (with a ravioli mould):
- Place one rolled pasta sheet over your ravioli mould and gently press the dough against the mould with your fingers.
- Add the filling.
- Have a little pot of water ready on the side. Dip your finger in and wet the dough all around the edges. This will help everything stick together like glue.
- Then place another sheet of rolled dough over it and press it shut using your fingers and the rolling pin.
- Flip the mould upside down to release the ravioli.
- Separate and trim any rugged edges.
- Re-knead all the trimmed edges together. If it’s too dry (and it most likely will be), rehydrate the dough by adding a tiny bit of olive oil as you knead it, until the consistency is right again. Then roll and so on.
NOTE: the picture collage for this section is old and I’ve learnt a lot since then. 😉 The dough should be much thinner and more floured (like in the hand made ravioli pictures).
HOW TO MAKE TORTELLINI:
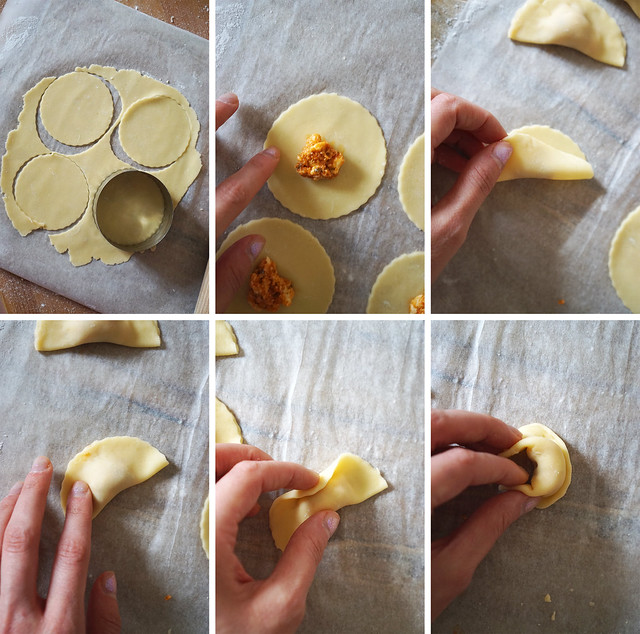
- Cut into squares or perfect circles using a cookie cutter.
- Add a bit of filling in the centre, rolled into a little ball. Note: don’t overdo the filling or you’ll struggle the fold your tortellini.
- Brush a bit of water around the edges to make everything stick together properly.
- Then fold each tortellini in half (diagonally if using squares) and press the sides shut to tuck in the filling (leaving preferably no air bubbles in the centre so tuck around the filling first, then towards the edges).
- At this point you can press the sides with a fork to create little dents and secure the tortellini even more, but this is optional.
- Fold in half again (or as much as possible), flip on the other side and join the two edges together, pressing them shut.
- Sprinkle a bit of flour on top and set aside on a plate while you make the rest.
- Re-knead all the trimmed edges together. If it’s too dry (and it most likely will be), rehydrate the dough by adding a tiny bit of olive oil as you knead it, until the consistency is right again. Then roll and so on.
NOTE: the picture collage for this section is old and I’ve learnt a lot since then. 😉 The dough should be thinner and more floured (like in the hand made ravioli pictures).

How to cook your gluten free filled pasta:
- Bring a pan of water (with a generous amount of salt) to boil.
- Once it reaches boiling point, add your pasta and cook for about 4 minutes. Note: the cooking time may vary and will depend on the thickness of your pasta.
- I served these with melted butter and grated grana padano which was so incredibly simple, but absolutely delicious. 🙂
Enjoy!

Have you tried freezing your leftover tortellini or ravioli? If you did, then how did hold up when you cooked it? I usually make tortellini and stick it in the freezer to pull out and boil for a quick meal, but my girlfriend is celiac and I’m wanting to make some gluten free to stick in the freezer for her! 🙂
Hey! I was planning to freeze some at the time I made these to test this out, but unfortunately we ended up eating them all. ? It should technically be ok, but as I haven’t tried it myself yet it’s hard to say. I’ll have to give it a go next week and get back to you. ?
My daughter who can not eat gluten said she could not tell that they were gluten free! That is high praise!! My flour did have xanthan gum and I did not have any so I didn’t add any to the flour and the dough came out the best I ever tried! Since we make these for Christmas Day, I did make them ahead and then froze them, first on a cookie sheet and once harden, then into a ziplock bag with wax paper in between the layers. On Christmas Day, dropped a few in boiling water and they came out perfect! Now she has some in her freezer for another day! Thank you for the recipe and all the detailed instructions!!
Hi.
Have you a recipe for a decent loaf of bread.
Hey! No sorry. I have a few bread roll recipes, but when it comes to loaves I haven’t really been happy enough with any of my attempts so far.
I see a comment above about freezing these. Have you tried to do so? Curious as well as I would like to make a big batch and freeze them!
Hey! Sorry I never got around to making a big enough batch of them to freeze.
Hi! Will I need the xantham gum if my gluten free flour already has it?
Hey! If your blend already contains it, it’s not necessary but if you do have some at home, then a little bit extra doesn’t hurt in my experience. 🙂
The blend I use doesn’t contain xanthan gum per se, but it contains another similar thickening agent and yet I like to add a bit of xanthan gum on top of that.
Hi Kim, I just randomly found this recipe and your blog. I am a ukrainian living in Canada and I always wanted to try making perogies that actually taste good and are gluten free. I will give your dough a try. Hopefully it will work!
Hi, I made this pasta today as ravioli and it came our super thick and huge. It was about 4 times the size of a regular cooked ravioli and I had to cook it for over 30 minutes 🙁
Hey, I’m sorry this recipe didn’t work for you. Can I ask what flour blend you used? It sounds like they may have been too thick perhaps? Homemade ravioli are often bigger than what you’d get from a supermarket, but they definitely shouldn’t take 30 minutes to cook so I’m not sure what went wrong. :/
This is the best gluten free pasta recipe, taste-wise and easiness to work with, that I have tried!!! I have tried a lot!!! I used Bob’s red mill 1 to 1 gluten free flour because that was what I had and it already had xanthan gum so I omitted it from your recipe. I rolled it thin with my rolling pin with no problems. From this recipe I was able to make about 2 dozen half moon shaped raviolis. My husband was unable to tell the difference between the g/f pasta and the regular pasta.
👍🏻👍🏻
I’ve used their recipe a couple times and it’s good. I used the America’s Test Kitchen gluten free flour blend. I have trouble with my tortellinis bursting sometimes but I don’t care about them that much. It’s good. Tastes good.
I love this recipe!! They came out perfect 🙂