

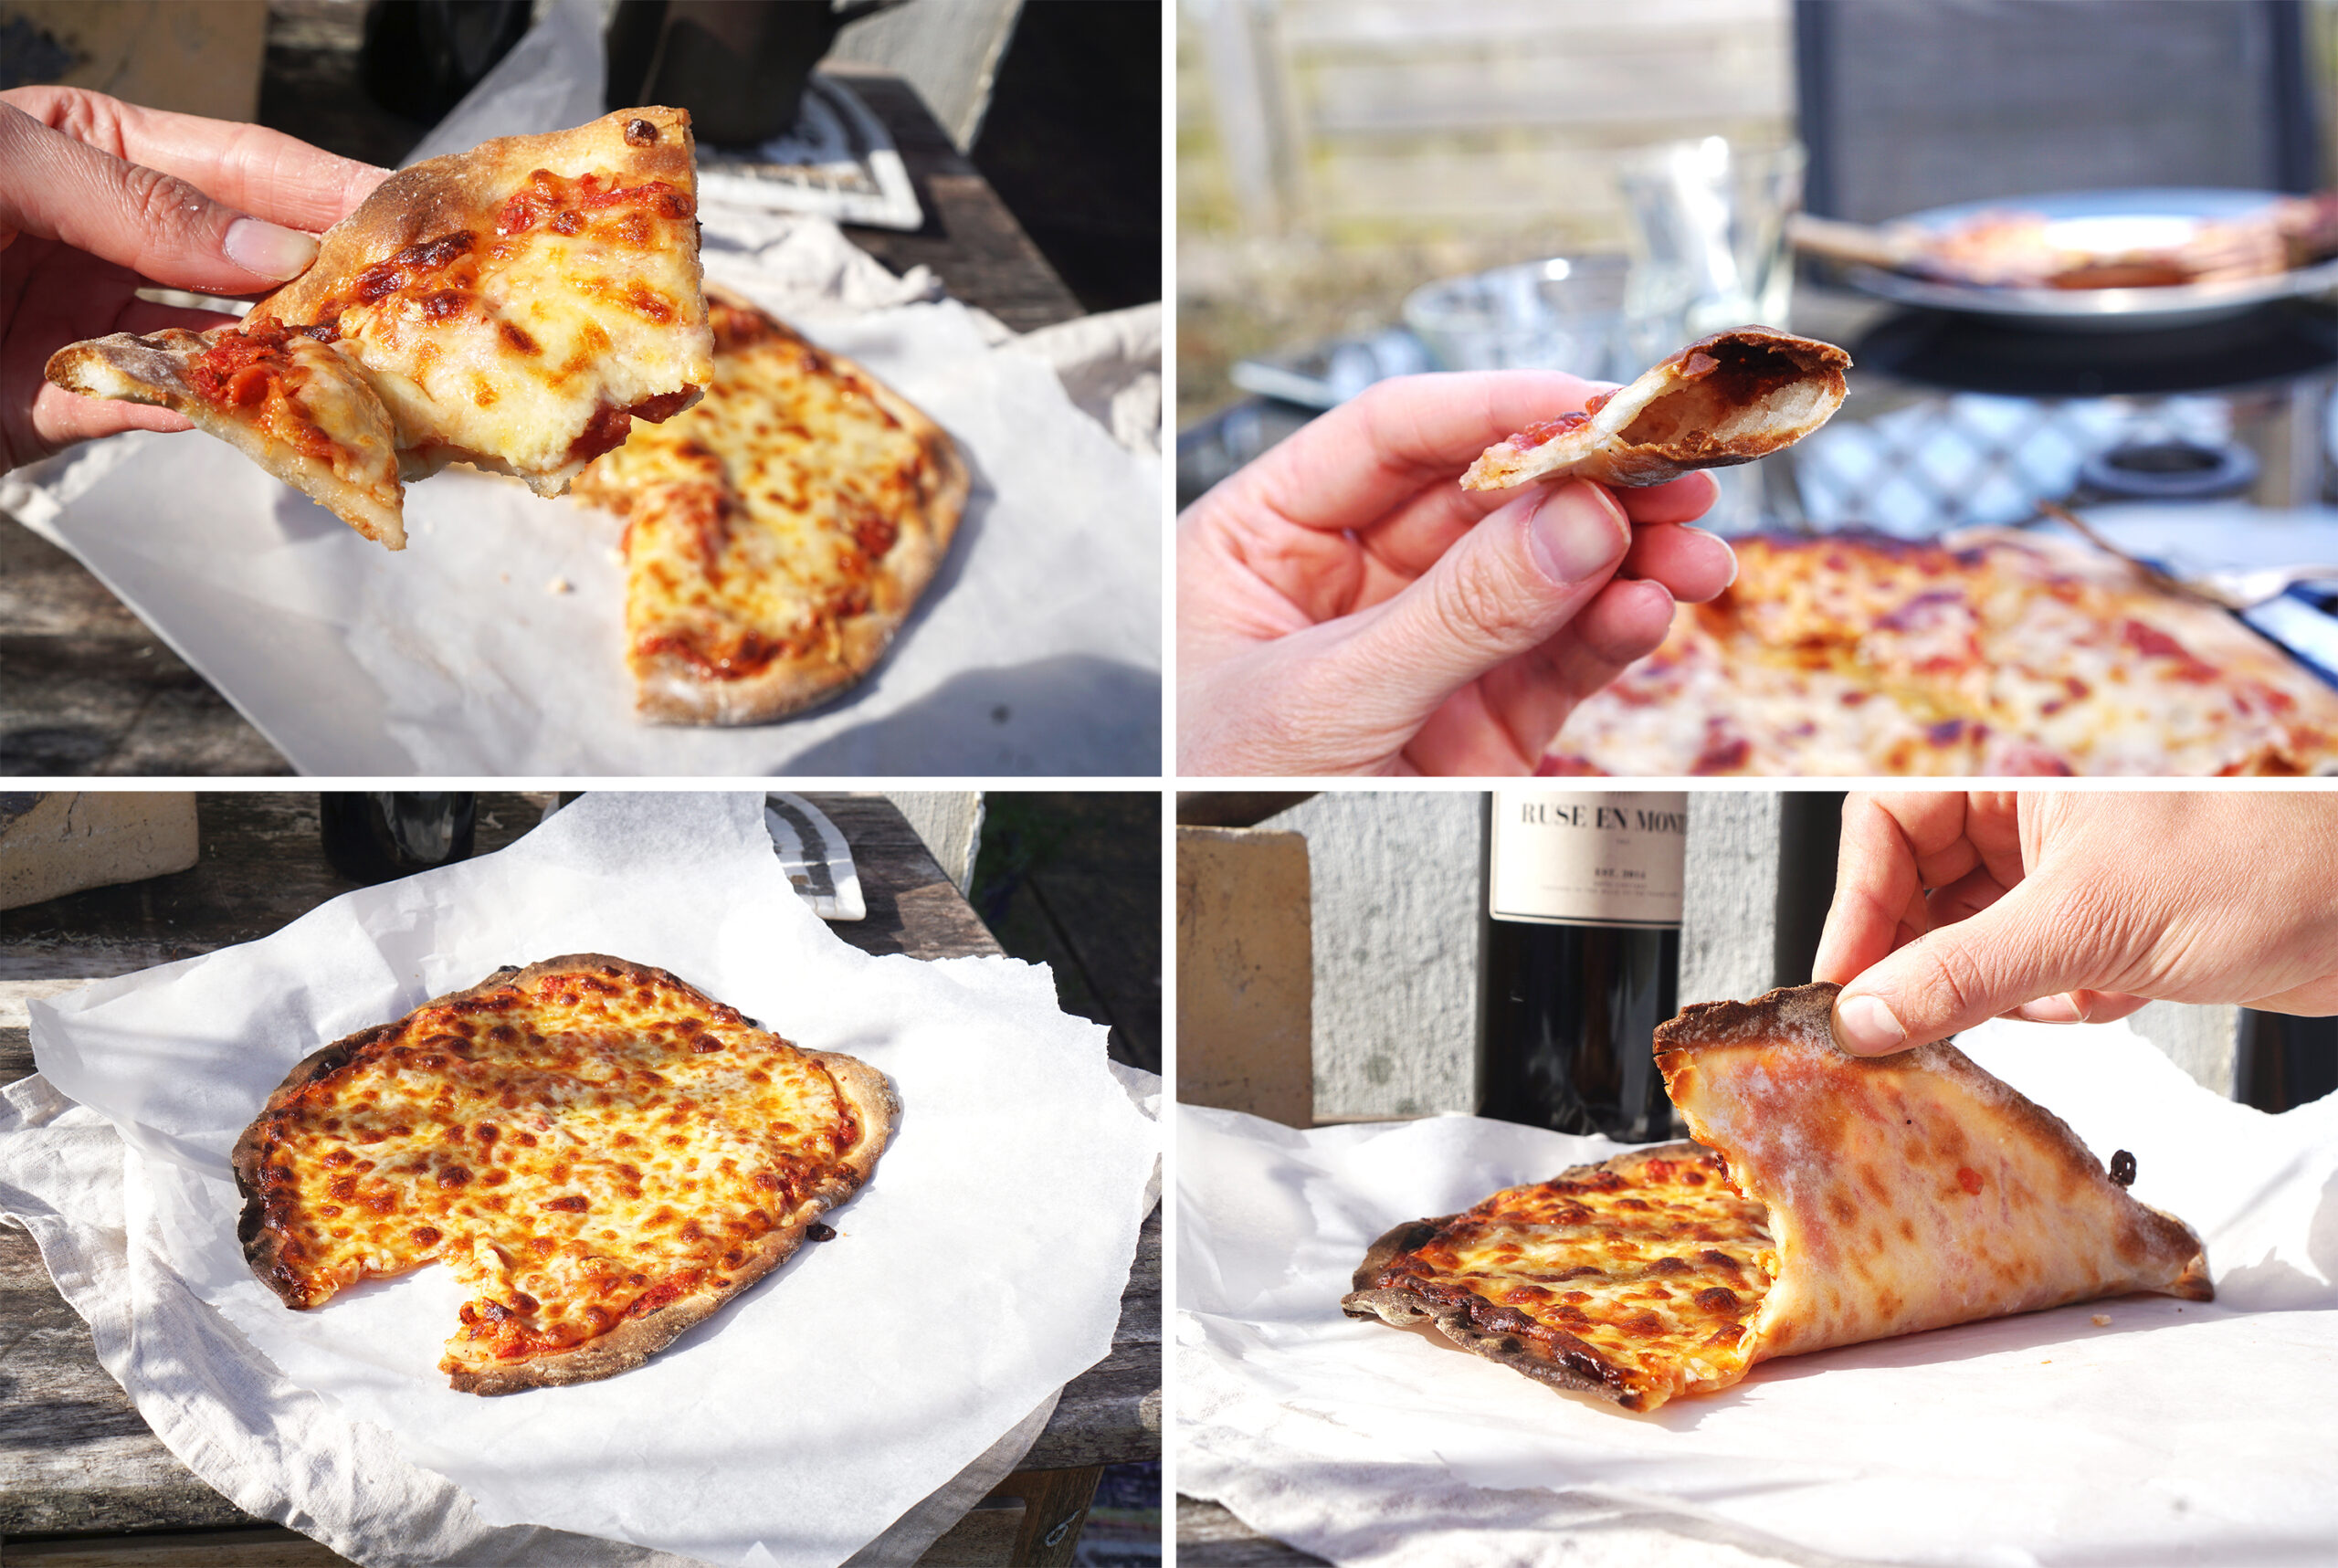
Oh my gosh guys, I finally did it. I achieved my homemade gluten free pizza dream i.e. a proper Italian restaurant style pizza with a thin pliable chewy base and super crispy outer crust. With those bubbles of air from the yeast. I mean, look at those bubbles. It’s so perfect I could cry right now!
Best of all, after years of trying a million different types of recipes, it turns out a basic classic pizza dough with just a few tweaks is best. No need for a million fancy ‘exotic’ flours that are hard to source or ingredients you’d never put in a ‘normal’ pizza. Just mainly bread flour, yeast and warm water like any old pizza base. With the addition of just one ‘special’ ingredient: lard.
MY TIPS FOR A PERFECT PIZZA:
1. Cook at the highest heat possible. Ideally the secret to a perfect pizza is cooking at a very high temperature. Since most of us don’t have the luxury of owning a pizza oven, the next best thing is using your oven’s highest possible heat setting. 260C (500F) yielded an amazing result for me, the closest I’ve ever gotten to a restaurant style pizza made at home. But if your oven doesn’t reach that high, at least 220C-240C will have to do, but it may not be quite as good.
2. Pre-heat your oven for at least 30 minutes. As I said above, the key is a high heat. Make sure your oven is properly pre-heated first.
3. And pre-heat your pizza tray too. It’s important for the bottom of your pizza bases to cook properly and get crispy.
3. Use bread flour. Bread flour blends have a higher protein content which gives pizza bases that chewier, sturdier, crispier texture. I used Freee Foods by Doves Farm.
4. Make sure you activate your yeast first. Instant yeast (that comes in a powder form) can be added directly with the rest of the ingredients, but dry active yeast (which comes in granules – what I’m using in this recipe) needs to be activated first in a sugary warm water mixture.
5. Don’t skip the resting time. It may be tempting to save time and cook right away, but the resting time is needed for the yeast to act and for the flour to absorb the liquid properly. The texture won’t be right without.
6. Go thin / the thinner the better. The trick to a proper Italian thin crust pizza base is to roll the dough extremely thin. Go as thin as you can, I promise it won’t crumble or fall apart.
7. Can I freeze them? Yes. If you want to make a big batch, just part-bake your pizza bases (about 7 minutes alone without toppings) and freeze.
Do I have to use lard?
I decided to use lard as a dough tenderiser (instead of butter or oil) and the result was so much better, the best gluten free pizza crust I’ve ever made. This is most likely due to the fact that butter contains water while lard is 100% fat. The higher melting point of lard also helps baked goods keep their shape. And don’t worry, you can’t taste it. If you definitely can’t use lard, go for butter (real butter, not margarine which contains even more water). Otherwise, olive oil as a last resort.

My gluten free pizza base recipe:

- 250g all purpose gluten free bread flour (I used Doves Farm)
- 2 tsp dry active yeast (I used Allinson)
- 2 tsp granulated sugar
- ½ tsp salt
- Optional: 2 tsp xathan gum (only if your flour blend doesn't contain it already - mine does)
- 20g lard (melted)(you can also use butter or olive oil, but lard works best in my experience!)
- 170g warm water (approximately, it may be a bit more or less depending on the flour blend you use)
- Rustic passata, mashed up canned chopped tomatoes or diluted tomato purée
- Salt (a generous amount)
- Black pepper
- Seasonings of your choice (I often use a mixture of oregano, basil, cayenne pepper and garlic powder)
- Extra mature cheddar
- Shredded mozzarella
- Anything else you'd like
BAKING TEMPERATURE: ideally 260C (500F) *See tips section above
BAKING TIME: 5-7 mins (for the base alone) + another 5-7 mins (with toppings).

Directions
ACTIVATE YOUR DRY ACTIVE YEAST:
- Measure 170g of water and warm it up in the microwave or a kettle. Dip your finger in and check the temperature. It should be quite warm, somewhere between lukewarm and boiling hot. If it’s too cold or too hot (boiling), it won’t work.
- Fill a small bowl with part of the water and set the rest aside for later.
- Add the two teaspoons of sugar in the bowl and stir to dissolve it.
- Then add your dry active yeast, stir quickly and leave the bowl to sit in a warm place for 10 minutes or so until it becomes frothy (like in the picture collage above). What I do is either place it on a window sill directly in the sunshine or turn the oven on to the lowest setting and place the bowl near or on the opened door.
PREPARE THE PIZZA DOUGH:
- Mix your flour and salt together in a bowl and then add the lard (melted in the microwave first) along with the frothy yeast mixture.
- Stir and then add the rest of the warm water little by little (you may need to heat it up again if it’s cooled down) until you reach a smooth, sticky, but quite thick dough.
REST THE PIZZA DOUGH:
- Grease the bowl with a bit of olive oil, cover with cling film and let the dough rest in a warm place for 2 hours. It won’t rise that much, but it’s still important for the yeast to do its thing, plus it allows the flour to absorb the liquid and produce a better texture.
- At this point you’re ready to cook your pizza. But for an even better texture, you can choose to rest the dough even longer. Some leave it in the fridge overnight or even up to 3 days.
KNEAD THE DOUGH:
- Sprinkle some flour on a large sheet of baking paper (we need to use baking paper as the dough is quite sticky), add the dough and sprinkle some more flour on top.
- Then knead the dough briefly, adding a bit more flour if necessary, just until you have a smooth dough ball that is still sticky but manageable.
- Divide your pizza dough into portions. This recipe yields 2 large, 3 medium or 4 small pizza.
PREPARE YOUR PIZZA BASES:
- Sprinkle a bit more flour on your sheet of baking paper, add one portion of the dough and sprinkle a bit more flour on top.
- Then squish the dough with your hands (and cover your hands with more flour if it’s too sticky) until you have a very thin base. As thin as possible.
- Shape up the outer crust; I like making it a bit thicker than the rest of the pizza to get that nice big crispy raised crust.
COOK YOUR GLUTEN FREE PIZZA:
- Pre-heat your oven to 260C (500F) (or the highest temperature your oven can reach – see tips section above) for at least 30-40 minutes and place your pizza tray in there so it’s pre-heating as well.
- Once ready, transfer your pizza base (still on the baking paper) onto the baking tray and cook for 5-7 minutes. Or until slightly golden with bubble of air forming.
- Take it out of the oven and remove the baking paper so it cooks directly on the tray for the rest of the cooking time. It should slide right off.
- Add your pizza sauce, cheeses and toppings of your choice.
- Cook for another 5-7 minutes or until the cheese has fully melted and the other crust has turned super crispy and golden brown.
Hope you enjoy it as much as I did and let me know what you think (either here or on insta)!
Kimi x
P.S.: And -> here <- are some of my other pizza recipes to try from a quick yoghurt pizza base, arepa pizza, pandebono pizza or glutinous rice and mozzarella.

Hi! I’m one of your American followers. Could you give me a suggestion on another flour to use? I cannot affordably get the one you use here, though I want it sooooo much! Even if i need to use a regular flour and add an ingredient to it, I’m willing. Thank you! I love everything that you do:)
Hey! Thanks so much. 🙂
I’m so sorry I took ages to reply. I’m not very familiar with the flour blends you have over there so it’s hard for me to recommend a specific brand. If you have any all purpose flour blends over there that are specifically made for bread (they basically contain a bit more protein) then it should work. Otherwise you can also try it with any standard gluten free all purpose flour blends. I’ve heard from some followers on Instagram who tried it and loved the result too.
Pingback: Gluten Free Thin Crust Yoghurt Pizza / A Yeast Risen, Upgraded Version ? - Kimi Eats Gluten Free
I just have organic dry active yeast (Bioreal) brand.
In the direction behind the backage:
Add the yeast to the flour direct .
Is it ok to use it? Or should I use another kind?
Unfortunately I just found doves farm all purpose flour and self raising
I couldn’t get the bread flour, which one should I use? What should I add to it to increase the protein?
Hi! If the packaging says you can add your yeast directly with the flour, then it should be ok. Some dry active yeast (like the one I use) come into little tiny balls and have to be dissolved and activated first, but some are in powder form and made to be added in with the rest of the ingredients. Make sure you still warm up the water first and just add the two teaspoons of sugar directly in with the rest of the ingredients too and it should be fine. ?
Although bread flour gives the best results in my experience, it’ll still be good with the standard all purpose blend. I’ve had people messaging me on Instagram to say that they’ve tried it (as none of us seem to be able to find bread flour at the moment! haha) and they all loved it anyway. ?
I just made it last night.. turned out great..but next time I’m thinking about adding more ghee/lard to the recipe..it’s little dry to my taste ..
Do you think it’s a good idea?
Btw, I baked it on nerd chef pizza steel stone ???
My pizza didn’t look as lovely as yours, but it tasted good. Will be trying the yoghurt crust next!
Hi Kimi, I absolutely love your website! I have recently started a gluten free sourdough starter and wanted to make a pizza base with the discard. As you are well versed in pizza bases I wondered if you had tried this or had any tips in substituting anything the above recipe to use sourdough discard in it.
Thanks!
Hey! Thank you so much and I’m so sorry it took me ages to reply, I only just saw your comment. It’s funny that you bring this up as I’ve been thinking about making a sourdough starter this week. Precisely to try making a sourdough pizza base. I haven’t gotten around to doing it yet, but I’ll let you know how it goes!?
I just made this and it was delicious. Thanks. Shop bought pizza bases are not very nice. Really enjoyed this ?
Thanks so much, I’m happy to hear you enjoyed it! 🙂
Hi there do you have the nutritional information/ macros for this recipe?
I just wanted to thank you from the bottom of my heart. As a person with Celiac and a family of 5, this is hands down the best pizza dough. The whole family loves it, and my three daughters want me to make it all the time. I am currently prepping the pizza crust for the freezer for the first time so making them in the future will be so much better than the store bought stuff. Thankful for you!